Time to admit a huge mistake. I finished the trestle and I was so happy with it. So, I went on to working on other things like the control panel and wiring switches. This meant that every time I opened the top to work on the inside, I had to remove the trestle. Apparently N scale trestles are delicate structures that don’t like constantly being handled. I had to reattach several pieces over the weeks and when the time finally came to do the final installation and connect the rails, I practically had to rebuild it. Lesson learned: when you build something with so many tiny parts, attach it firmly to its final place right away!
Anyways, the trestle is on a relatively tight curve; 11” radius. I attached one end of the curve permanently to the layout and then placed the trestle in place.

Then I tried to attach the other end of the curve to the trestle while trying to glue the track down. Trying to curve the flex-track while attached put too much stress on the trestle and many bents fell out. In the picture above, you can clearly see the second bent from the left totally bent out of place. (har har har)
Looking back on it, I probably should’ve cut both the flex track for both sides of the trestle in advance, attached them both to the trestle and installed the whole thing as a single unit. I’m also thinking this wouldn’t be that big of a problem if one’s using Microscale Engineering track as that flex track is quite rigid really holds its shape when bent into a curve. I’m using code 80 Peco flex-track which really earns its name. You let it go, and it goes back to being a straight track.
Anyways, I carved slits in the foam under the trestle for the bents to go in. When the track was firmly in place, I started filling these slits with lightweight spackle. In the picture below the two bents on the left are done and the third one is still hovering over the slit in the foam.

Once the spackle dries and hardens, the bents are firmly in place and the whole thing easily supports the trains going over it. I also used the spackle to create land contours around the end bents. The two pictures below show the end result. Actually, the whole thing looks much nicer after I sanded the rough edges of the spackle. Unfortunately, I don’t have a picture of that.


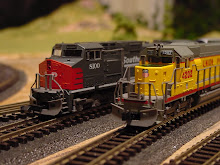
Here’s another shot of a later stage with both sides of the trestle connected.

And finally, here are two videos of the test run on the trestle!


Can’t wait to finish the scenery around the bridge!


No comments:
Post a Comment