The small layout has been operational for a while. The one problem that immediately became clear was that there wasn’t an easy way to put trains on the track, pick them up and store them. I’ve been contemplating a cassette solution for a while. A cassette is essentially a removable piece that connects to your railroad. You drive your train onto the cassette and then the cassette as a whole can be removed for storage, eliminating the need to handle the trains directly. Iain Rice’s wonderful book about shelf railroads has a lot of great information about building and using cassettes. Make sure you visit Carl Arendt’s site for several examples of cassettes.
Background
As I was researching cassettes and other options for staging, I came across the Train-Safe Vision product. Fantastic engineering, but prohibitively expensive. A 30cm long one was over 40 Euros! The thing I liked the most about the Train-Safe stuff was that it was such a snug fit that the train didn’t derail even if you tip the case.
So, I decided to see if I can build something similar from the scrap wood and plexiglas pieces I had lying around. I was going to have an outside spur on the layout be interchangeable with cassettes (shown below with two freight cars).


The usable part of the spur is 8”" long. That was to be the length of the cassette. Typically, the cassettes are not on the layout, but rather adjacent to them. However, this wasn’t possible for me as the layout fits in a window alcove and is blocked on three sides.

Building the Cassette
To start with, I cut two strips of 1/4” thick wood that are 8” long and 1” wide. These would form the top and the bottom of the cassette.


Testing the Cassette
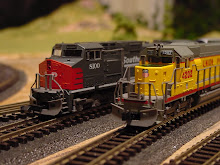
I placed the cassette where it would fit on the layout and then run my SD-45 with a passenger car behind it to see if there are any clearance issues. It’s tight, but it works. The SD-45 and the passenger car are the largest pieces of equipment that’ll run on this layout, so I think I’m good.


And it fits perfectly in the built-in storage drawer of the layout. As you can see once I have all the cassettes built, it’ll bring a much needed organization to this messy drawer. Not to mention the reduced wear and tear on the rolling stock.

Here is a video of me handling the cassette. As you can see both the engine and the rolling stock remain on the rail. The only time they derailed was when I slammed the cassette on the table and they bounced off the track.

This looks like it’s going to be a good solution for my needs and it cost me an hour of my time and less than $1 in materials.
Next Steps
Before the cassette is fully functional, I need to do the following:
- Carefully cut out the spot where the cassette will fit on the layout.
- Prepare rail joiners for aligning track. I plan to solder the rail joiners to the layout and then enlarge the end where the cassette rail will attach.
- Cut foam blocks for each end so the train won’t roll off the cassette.
- Attach grooves to the bottom of the drawer for the cassette to fit to prevent tipping as you open and close the drawer.


No comments:
Post a Comment